Cold Process Soap Recipe Basics: Build Your First Bar
Published How we research
A cold process soap recipe is a list of oils and their weights, plus the lye and water needed to turn those oils into soap. Rather than copying a number from memory, soap makers build a recipe by choosing oils for the qualities they want and then running the weights through a lye calculator. This article explains how the pieces fit together, from picking a balance of hard and soft oils to mixing, molding and curing, so that you can read any recipe with confidence and adjust it safely.
Products from this article
The highest-scoring picks from the buying guides this article links to. Scores are our editorial assessment, not customer ratings.
+ 2 Pack means a sealed spare stays dry until the first tub is used
From our guide: Best Lye for Soap Making
+ 0.1g precision helps weigh small amounts of lye and additives
From our guide: Best Digital Scales for Soap Making
+ Stainless steel shaft handles caustic soap batter well
From our guide: Best Stick Blenders for Soap Making
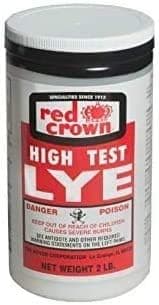
+ Boyer lye is a long-established name among cold process soap makers
From our guide: Best Lye for Soap Making
What a cold process recipe contains
Every recipe has four basic parts: oils or fats, sodium hydroxide, water and optional extras such as fragrance, color and additives. The oils are weighed first, and the lye and water amounts are calculated from them. Recipes are usually written in grams or ounces by weight, never by volume.
Because the lye amount depends on the exact oils, you cannot swap an oil for another without recalculating. Even two oils that look similar can need different amounts of lye.
Choosing oils for the bar you want
Different oils bring different qualities. Coconut oil adds cleansing and big bubbles, olive oil adds mildness, castor oil supports lather, and butters such as shea or cocoa add hardness and a creamy feel. Many makers aim for a blend that balances hardness, conditioning and lather, using well known starting ranges from soap making references.
Too much of one oil can cause trouble. A very high share of coconut oil can feel drying, while a very high share of soft oils can give a soft bar that takes longer to cure. Start from a tested recipe and change a little at a time.
Using a lye calculator
A lye calculator takes your oils and weights and returns the amount of lye and water. Enter the correct lye type, pick a superfat and double check the oil weights before you mix. Different calculators can vary slightly, so use one you trust and stick with it while you learn.
Print or save the result with your recipe. Re-enter the numbers if you change anything, even a small amount of oil. Take notes as you go so the next batch goes more smoothly.
Setting the superfat
Superfat is the percentage of oil left unreacted so the bar has a little extra conditioning and a safety margin against excess lye. Many recipes use a modest superfat, and higher numbers make a softer, gentler bar that can be more prone to spoiling.
If you are unsure, begin with the figure given in a tested recipe and adjust in small steps over several batches. Our superfat article explains the trade offs in more detail.
Mixing the batch
Weigh the oils into a heat safe container and melt any solids. In a separate container, add lye to water and stir until clear, then let it cool. When both are within a comfortable temperature range, combine them and blend with a stick blender in short bursts until the mixture reaches light trace. Lye is caustic. Wear splash goggles, chemical resistant gloves and long sleeves, work in a ventilated space, keep children and pets away, and always add lye to water, never water to lye.
Add fragrance and color at light trace, and work quickly if the batter starts to thicken. Stop blending as soon as you can see a faint trail on the surface.
Molding, insulating and cutting
Pour the batter into a prepared mold and tap it to release air bubbles. Many makers cover the mold with a towel or cardboard for a day to keep the heat in, which helps the soap through its gel phase, though it is optional. Unmold when the soap is firm enough to hold its shape.
Cut into bars with a wire cutter or a sturdy knife and a miter box, keeping fingers clear of the blade. Wear gloves while the soap is still fresh, because it can still be caustic on the first day.
Curing and testing
Set the bars on a rack with airflow and let them cure for several weeks. During this time the water evaporates and the bar hardens. Some makers test pH with strips, but strips are only a rough guide and cannot replace correct measuring.
If a bar feels harsh or stings, do not use it on skin. Keep notes for each batch, and compare the results to find what you want to change next time.
Adjusting a recipe safely
Change one thing at a time, such as swapping a share of one oil for another, and recalculate the lye every time. Keep the batch size small while you test, and label every bar with the date and recipe name.
Resist the urge to invent a recipe from scratch before you understand how each oil behaves. A solid foundation in the basics will save you wasted materials and keep every batch safer.
Temperatures and timing
Many makers combine lye solution and oils when both are in a similar, moderate range, often somewhere around room temperature to a little warmer, though recipes differ. Hotter mixtures speed up trace and can cause overheating in the mold, while cooler ones give you more time for swirls and designs. If a recipe uses a lot of hard butters, the oils may need to stay a bit warmer so they do not begin to solidify.
A thermometer is a helpful tool for beginners, though some makers eventually judge temperature by touching the outside of the containers. Use whatever method helps you repeat results, and write down what worked.
Common beginner mistakes
The most frequent problems are weighing errors, using the wrong lye type, skipping a recalculation after swapping an oil, and cutting the cure short. Another is working in a rush with distractions around. Slow, planned steps prevent most of these.
If a batch seizes, separates or looks off, do not use it without thinking it through. Read about common mistakes and how to fix them, and when in doubt, treat the batch as practice and start again with fresh ingredients.
Planning your first few batches
Make a small test batch with a simple recipe of three or four oils. Keep the same recipe for a couple of batches so that you learn what is normal for it, then change one thing at a time. Keep bars from each batch and compare how they feel and last.
Choose a mold that suits your batch size, and line it if it is not silicone. Having the mold ready before you start keeps the process calm.
Popular right now
- Best Melt and Pour Soap BaseBuying guide
- Best Shea Butter for Soap MakingBuying guide
- Choosing Fragrance Oils for SoapArticle
- Embedding Objects in SoapArticle
- Best Natural Soap Colorants From Clays and BotanicalsBuying guide
- How to Use a Soap MoldArticle
Based on the last 28 days of search and visitor data.